Today I’ll be showing you how to create your own cross processing effects using Photoshop. Back in the days, film photographers would deliberately develop their photos with the wrong chemicals to get really cool abstract color effects. We can now do it easily in Photoshop and I have an awesome layer setup that makes this incredibly easy. In this tutorial, you’ll learn how to setup just three layers that will let you create an unlimited amount of retro effects in a short time. It’s fun, easy and fast. So if you’re ready to create your own effects, let’s get started.
The Layer Setup
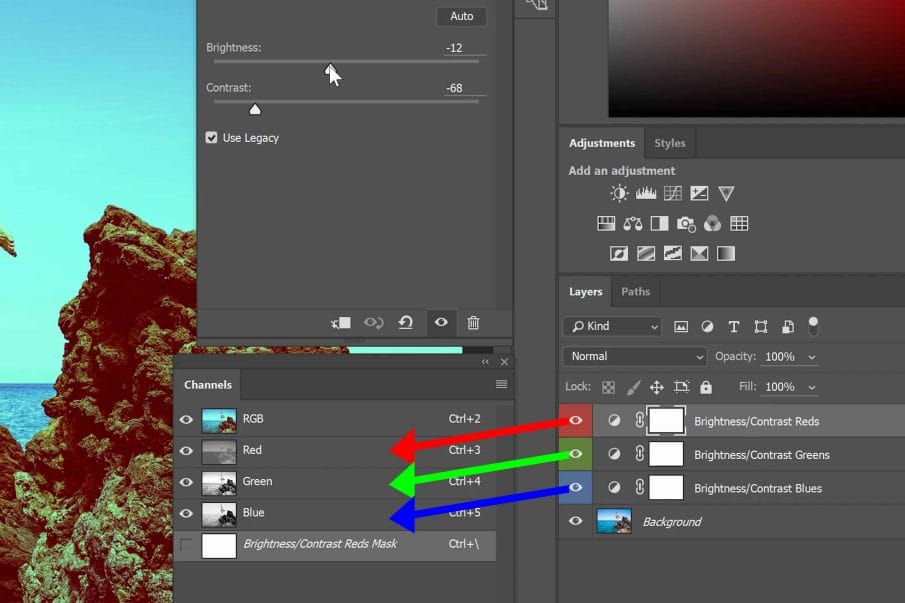
Before we begin, let me show you how this works. Instead of learning how to create just one cross processing effect, you’ll learn how to create a layer setup that will let you create an unlimited amount of effects. Looking in the layers panel here, you can see that we have 3 brightness contrast layers. These layers can be adjusted to create various cross processing effects.

What it’s Doing
So what exactly is happening here? To show you I’ll drag the Channel panel out like this. Each one of these layers affect only one channel. So the red layer here will affect the red channel. This green layer will affect the green channel. And the same thing with the blue layer. For example, when I make adjustments this red layer, it will only affect the red channel. And you can see this in the Channels panel. The red channel is getting more contrast but the green and blue channels aren’t being changed at all. There’s actually a name for this technique and it’s called Channel Contrast. But instead of using the Curves adjustment which most people don’t know how to use properly, you’re using a layer setup that’s easier to adjust and more suitable for beginners.

Cross Processing Photoshop Tutorial
Step 1
Okay so you now know how the layers work. It’s time to learn how to setup the layers. Go to your adjustments panel and add a Brightness Contrast adjustment layer. If you don’t see this panel, you can open it by going to Window > Adjustments.

Step 2
When you make changes to this layer, it’ll affect all three channels. So how do we make it so that it only affects one channel? The answer is Blending Options. Right-click on the layer then choose Blending Options. In this area here, you’ll see three checkboxes. Simply uncheck the green and blue channels and your layer will now only affect the red channel.
Step 3
We need three of these layers, one for each channel, so let’s duplicate the layer by pressing control or command J twice. For better organization, I’m going to rename the layers and add color labels to it. Reds… greens… and blue. For the color labels, simply right-click on the layer then pick the color you want to label it with. These labels don’t actually do anything other than labeling your layers with a color so it doesn’t matter if you do it or not.

Step 4
We’re done with the layer organization. Now let’s finish setting up the other layers. Right-click on the Green channel then go to Blending options. Uncheck the red channel and check the green channel.

Step 5
Do the same for the Blue channel. Uncheck the Red Channel and checkmark the blue channel.

Step 6
The last thing to do is to go into all of the adjustment layers and enable the Use Legacy option. This option prevents Photoshop from trying to preserve the tones in your image so that you can apply much more drastic effects. Play around with the settings on all three layers and see what kind of effects you can create.

Final Results
Here are some examples of effects that I made using this technique. The effects are shown at full-strength but can be easily faded to the amount you like by changing the layer opacity.


Thank You
Thanks for reading this tutorial! Please subscribe to my channel if you liked this video. I’d also love to hear your feedback so let me know what you think in the comments.
